


Table of contents
- #Day 18 Task of #90DaysofDevops challenge🚀
- Docker Compose
- What is YAML?
- Task-1
- Learn how to use the docker-compose.yml file, to set up the environment, configure the services and links between different containers, and also to use environment variables in the docker-compose.yml file.
- 1)Install docker-compose
- 2)Create a docker-compose.yml file inside the project folder
- 3)Run the docker-compose.yml file
- 4)Verify that the application is working by accessing it in a web browser
- Task-2
- 1)Pull a pre-existing Docker image from a public repository (e.g. Docker Hub) and run it on your local machine. Run the container as a non-root user. Run the container as a non-root user (Hint- Use the usermod command to give the user permission to docker). Make sure you reboot the instance after giving permission to the user.
- 2)Inspect the container's running processes and exposed ports using the docker inspect command.
- 3)Use the docker logs command to view the container's log output.
- 4)Use the docker stop and docker start commands to stop and start the container.
- 5)Use the docker rm command to remove the container when you're done.
#Day 18 Task of #90DaysofDevops challenge🚀
Let's start,🚗
Docker Compose
Docker Compose is a powerful tool that can help you to define and run multi-container Docker applications. It is a great way to simplify the deployment and management of your applications.
What is YAML?
YAML is a data serialization language that is often used for writing configuration files. Depending on whom you ask, YAML stands for yet another markup language or YAML ain’t markup language (a recursive acronym), which emphasizes that YAML is for data, not documents.
YAML is a popular programming language because it is human-readable and easy to understand.
YAML files use a .yml or .yaml extension.
Task-1
Learn how to use the docker-compose.yml file, to set up the environment, configure the services and links between different containers, and also to use environment variables in the docker-compose.yml file.
Docker Compose is a tool that assists in defining and sharing multi-container applications. By using Compose, we can define the services in a YAML file, as well as spin them up and tear them down with one single command.
Docker Compose is used for running multiple containers as a single service. Each of the containers here runs in isolation but can interact with each other when required. Docker Compose files are very easy to write in a scripting language called YAML, which is an XML-based language that stands for Yet Another Markup Language.
1)Install docker-compose
sudo apt-get update && sudo apt-get install docker-compose
2)Create a docker-compose.yml file inside the project folder
vim docker-compose.yml
inside the Vim editor
syntax:
version: "3.9"
services:
my_web_app:
container_name: "django-todo_app"
build: .
ports:
- 8000:8000
volumes:
- django_todo_volume:/data
my_db:
container_name: "django_mysql_db"
image: mysql:5.7
ports:
- 3306:3306
environment:
MYSQL_ROOT_PASSWORD: test@123
volumes:
django_todo_volume:
3)Run the docker-compose.yml file
docker-compose up
docker-compose up: This command does the work of the docker-compose build and docker-compose run commands.
docker ps or docker-compose ps command list all the containers in the current docker-compose file.
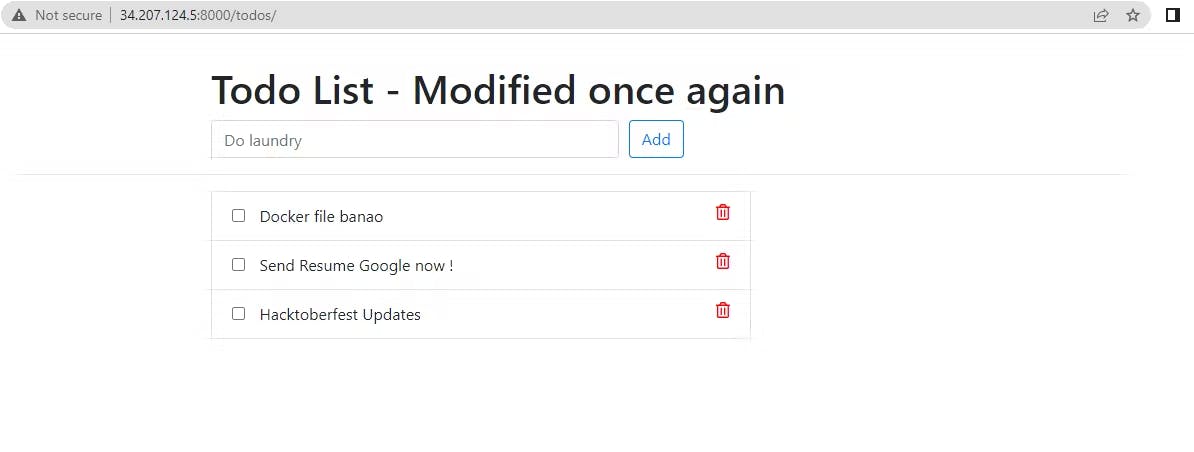
4)Verify that the application is working by accessing it in a web browser
Task-2
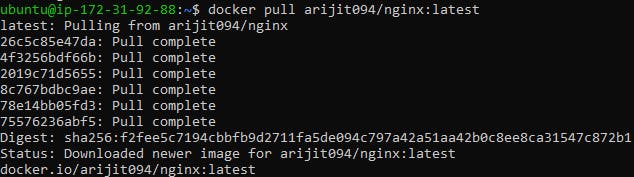
1)Pull a pre-existing Docker image from a public repository (e.g. Docker Hub) and run it on your local machine. Run the container as a non-root user. Run the container as a non-root user (Hint- Use the usermod command to give the user permission to docker). Make sure you reboot the instance after giving permission to the user.
The sudo usermod -aG docker $USER command adds the current user to the docker group.
Here is a breakdown of the command:
sudo: This is a prefix that tells the command to be run as root.usermod: This is the command used to modify a user account's properties.-aG: This option tells theusermodcommand to append thedockergroup to the list of groups that the user belongs to.docker: This is the name of the group that the user is being added to.$USER: This is a special variable that is set to the current user's username.
Then reboot the instance after giving permission to the user.
sudo reboot

Copy the docker image command from dockerhub-
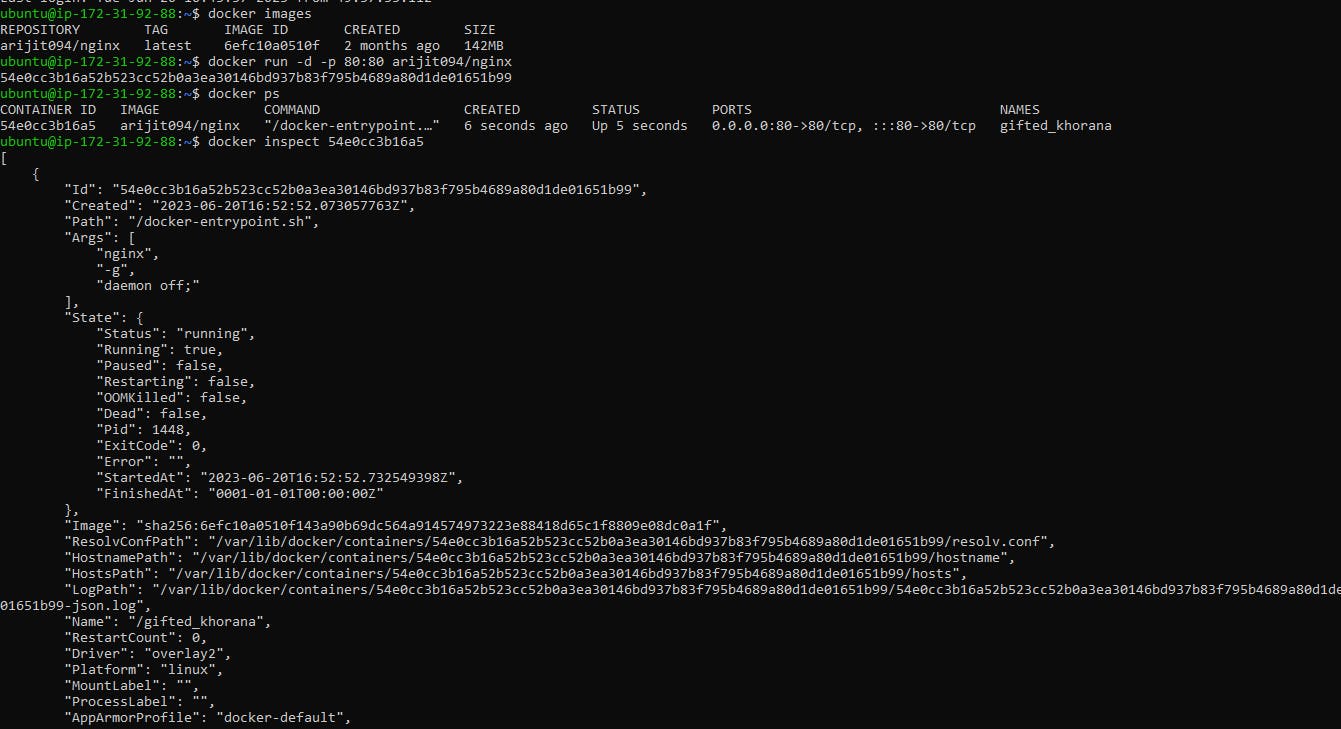
2)Inspect the container's running processes and exposed ports using the docker inspect command.
The docker inspect container-id command is used to get detailed information about a Docker container. The container ID is a unique identifier that is assigned to each container when it is created.
The docker inspect command is a powerful tool that can be used to get detailed information about Docker containers. This information can be used to troubleshoot problems, debug applications, and manage containers
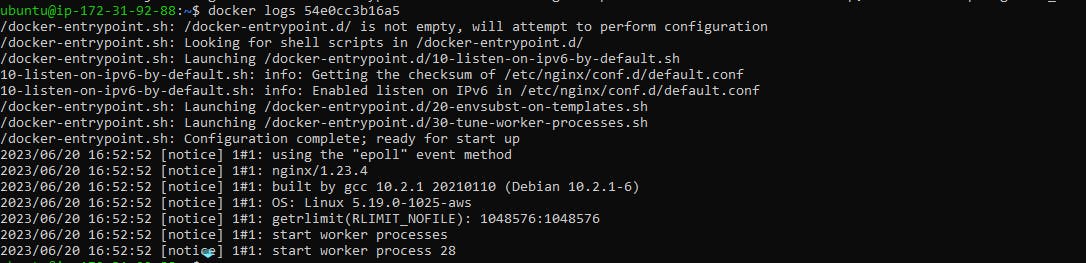
3)Use the docker logs command to view the container's log output.
The docker logs command is used to view the logs of a Docker container. The logs contain information about the container's startup, execution, and shutdown.
4)Use the docker stop and docker start commands to stop and start the container.
docker stop <container-name or ID>
ubuntu@ip-172-31-92-88:~$ docker stop 54e0cc3b16a5
docker start <container-name or ID>
ubuntu@ip-172-31-92-88:~$ docker start 54e0cc3b16a5
5)Use the docker rm command to remove the container when you're done.
Before removing the container you need to stop the container and then write this command :
docker rm <container_name or ID>
example :
ubuntu@ip-172-31-92-88:~$ docker stop 54e0cc3b16a5
ubuntu@ip-172-31-92-88:~$ docker rm 54e0cc3b16a5
force remove :
ubuntu@ip-172-31-92-88:~$ docker rm -f 54e0cc3b16a5 [no need to stop the running container]
Thank you very much for giving your valuable time for reading this article !!☺😊
Arijit Manna